2.06.2014

Budgeting for Baby: Medical Expenses & Accepting Help

Medical Expenses 
I am no expert on the medical/financial side of having a baby, so that component to this post will be brief.  I have been extremely fortunate to have maternity insurance for both of my pregnancies, because my husband had benefits through his job.  I know not everyone has that privilege.  But I also know that there are many responsible ways to finance a baby.  Nearly all of my husband’s side of the family works in agriculture, which provides a lot of different perks, but not always health insurance.  Some are also self-employed in other industries.  They have all had several babies in a responsible financial matter, and paid for them all very differently.  Talk to people, talk to your healthcare provider, talk to coworkers, research, and find a good fit on what works for you.  They have all done things differently and found ways that work for them.  Most of them have at least 4 kids and live in a rural area, so it is definitely attainable!     

However, even though I have had decent maternity coverage, it can still be expensive.  We pay monthly for insurance, plus a big bill to the medical staff, and a good chunk to the hospital.  One thing to look into is an HSA account.  I don’t know tons about them, my husband deals with ours.  But it has been helpful.  Many employers even contribute or match to them, and they can be used on anything medical (like having babies, going to the dentist, or even a sport’s physical, etc.). 


And my last tip is, pay off what you can as quickly as you can.  For many people, the medical side of child bearing might put a financial strain on a budget, and put the family into some debt.  That is okay, if you are being reasonable and responsible.  But--make a plan on how to slowly or quickly (whatever is doable for you) chip away at the remaining expenses after the baby is born.  It is stressful to start getting a lot of extra bills in the mail.  What worked great for us when I had Landon (and what we plan on doing for this baby), is paying off the remainder of our costs when we get our tax return or when my husband gets a quarterly bonus.  It is one of the few times a year we get a larger chunk of money that we don’t budget into our daily expenses.  So while getting new furniture or going on a fun trip sounds so enticing, we do the responsible thing and pay off our debts.  And it is so nice for the extra bills to disappear and to know that we are free and clear of those expenses.  We might not have a glamorous vacation to reminisce on, but that’s okay!  Sacrifices…remember?  If you don't have a big chunk of change like that, then slowly paying it off will work just as well too!  Again, talk to people that are in similar situations and see what has worked best for them.  Communicate with the hospital (or birthing center or midwife) about payment options.  It is best to look into this before the baby arrives, because there might be payment options that are more beneficial to you, if you start the process earlier rather than later.  

Sorry I can't give more specifics on this big part of paying for a baby, but everyone is so different in their circumstances, that it really is hard to pinpoint what will work best for each individual family.  Hopefully I at least gave you some ideas/direction on options you might not have thought of.  

Accept the Help that Comes, But Don't Expect a Certain Kind of Help
So, while baby showers are a cultural norm, especially for a first-timer parent, please don’t expect your family, neighbors, and coworkers to provide everything your baby needs.  I hope every momma gets at least one baby shower, because they truly are helpful and it really is such a nice gesture.  But please, don’t think that every baby you have you “need” to have a shower—it’s my opinion, but it’s tacky.  It's not that I don't believe in celebrating "every baby" (I've heard that as a reason to have a shower for every one), because showers are really just asking people to bring you stuff.  If you are worried about a celebration, there are plenty of other ways to celebrate!  I know that everyone won’t agree with that opinion, but I’m allowed to have it.  I was shocked when I heard someone saying that they were asking someone to throw them another baby shower because they still needed some stuff, like diapers, pacifiers, etc.  I thought to myself, “did she not anticipate having to pay for anything on her own?”  So, disagree with me if you would like, but just know that you can do most, if not all, of it on your own!  And I’m sure you will be surprised at the generosity of others.  Family members and neighbors still often bring by gifts, even if you don’t have a shower.  Friends will bring by a big bag of hand-me-downs that have a bunch of potential.  You will feel the love.  You will have help.  Just don’t plan on having a certain kind of help.  Just accept the kind of help that comes your way.  And reciprocate the help when you know of someone else having a baby!  You will remember how much you appreciated it, so do it for someone else. 

This might sound like a harsh philosophy to have, but I am of the opinion, that child bearing and rearing is a responsibility that we must take upon ourselves.  We can't have the feeling of entitlement when it comes to providing for our families.  I whole-heartedly feel that being a mother (or father) is one of the most important and divine things we can do in this life, and that it is our purpose here.  I personally believe that God commanded us to have children and not delay this important part of our lives.  I also strongly feel though, that God wants us to be as self-reliant as possible, and that he also gave us brains to figure out how to problem-solve, prepare, and provide for ourselves and families.  Sorry for the post to take a religious tangent, but I just wanted to explain part of the thinking behind my perspectives.  Because of my beliefs, I think the time table for every family in regards to child bearing will be different, and that is okay.  It is between husband, wife, and God, and it will look different for everyone.  So take that for what it is worth to you!  My next post will be more practical and small ways to begin preparing for a baby!  Stay tuned!

For other posts in this series:
Introduction

2.05.2014

Budgeting for Baby

I know, I know…I’ve been so lame at posting.  But this blog is a just-for-fun thing right now, and sometimes exhaustion and other responsibilities (like motherhood and such) take priority, ha!  I did want to do a few posts on “budgeting for baby”, seeing as this is my second go-around, and I have a little bit of advice that I feel like might be useful to other mommas and mommas-to-be out there.  I'm in nesting mode at the moment, since this baby girl can really arrive at any point now!

First off, I just want to say, that everything I am going to post in regards to this are my personal opinions, preferences, and experiences.  Having a baby is personal, and what works for me will surely not work for everyone.  And who knows, after having baby girl, some of my opinions might shift or change on what works, because having two kids will be a heck-of-a-lot different than having one babe.  My world is about to be rocked, folks! 

We all know this, babies are p-r-i-c-e-y!  Or they can be for many families.  Obviously, I am basing my comments on a healthy pregnancy and birth.  Those who have medical complications and things are definitely going to face different financial burdens that often are hard to anticipate or prepare for.  There is nothing wrong with that and I genuinely  hope the best to the families in those situations.  It is never something that is desired, but thankfully we live in a time when many resources are available to us and I’m very grateful for that! 

With that being said, I know many of us might not feel like we ever “have enough” money to have a baby.  However, it is my personal opinion, that parents should be responsible to plan and anticipate most costs of having a baby, and be able to provide for their needs.  Depending on your situation, it might mean having maternity insurance, researching cash pay plans, or other resources available to you.  That also might mean, looking at where you can trim your grocery store costs and shave off money to put towards diapers and wipes.  It might mean making some sacrifices.  That is part of being a parent.  Please don’t feel sorry for yourself if you can’t go out to eat every week or your baby doesn’t have the most current Baby Gap line of clothing in their closet.  It is not what being a parent is about and you make things work with what you have!  That’s what this series is all about!  Parenthood is much too precious of an experience to get sucked up into peer pressures of keeping up with the “baby Jones’”.  Between blogs, Facebook, and Pinterest, it is pretty easy to feel like a lousy parent if you compare yourself to everyone.  I hope this blog series will help alleviate some of those negative feelings and instead make you feel empowered with what you have and give you ideas on how to be creative to provide a fulfilling and happy experience for your family when a baby is born--not a stressful and negative one that you dread or resent.  Being a parent is the most rewarding and life-changing experience a person can have.  

So hopefully this baby series is helpful to some expectant parents! Please leave comments with your opinions and suggestions--the way I came up with many of my ideas is from hearing what worked for other people and tweaking it to work for me!

Other posts in this series:
Budgeting for Baby: Medical Expenses & Accepting Help

1.10.2014

Mocktail Party


So, I have been dying to throw a mocktail party, and New Year's Eve seemed like the perfect time to do it.  Basically, it's like a cocktail party, just for fun, but without alcohol.  My husband and I, and many of our friends, are Mormon, so we don't drink alcohol.  But that doesn't mean we can't dress up a little fancy, sip on a mixed yummy drink, and nibble on hors d'oeuvres!  Even if you do drink, a mocktail party is still a family-friendly party that is a blast to plan and host.

And although we did this for New Year's, it is easily a get-together for any random night, and I think it would be an especially fun Valentine's Day party as well.  So feel free to adapt and use this idea for any time of the year!  I'll share a few photos with you, and give you some direction on tutorials or inspiration that inspired my frugal decor and food.
 black and white paper garlands: DIY
colorful pom pom garland: DIY
golden animal label holder: DIY (tutorial here)
sheer polka dot table runner: 1 yard of fabric from IKEA (99 cents/yard)
glass jars holding chex mix, nuts, and kisses: DIY (dollar store glasses and candlesticks glued together)
wooden tea light holder: thrifted for $3 (similar DIY version here)
black vases: gift from friend, but appear to be thrifted vases spray painted--easy DIY
gold frames and sayings/labels: gold frames from Dollar Store, sayings/labels created in picmonkey and printed as jpg file
 Drink recipes:
So here is how I kept this party affordable--I made most of the decor using really inexpensive products or used what I had, I made two pitchers of "signature" drinks (the Cos"mock"politan and Mint Mojito), and then had a few bottles of sparkling cider and some grenadine and 7up for Shirley Temples, and I purchased all of the paper goods (plastic "glasses" for drinking [6 pack for $1], paper plates, napkins, silver plastic utensils) at the Dollar Store.  I asked half of the guests to bring an appetizer to share, and the other half a dessert to share.  I was worried about having enough food, but we had way more than necessary!  I also had a small container of chex mix and mixed nuts on the table, along with a few garnishes (cherries, olives, and lime wedges).

All of the black-and-white garlands as well as the gold garland for the photo booth backdrop were made with scrapbook paper.  I was inspired by this pin, this pin, and this pin for all my garlands.  I used my silhouette machine, but you could easily cut strips out with a papercutter, go to your local scrapbook store and use a die-cut machine, or purchase a scrapbook punch of a circle/square/triangle to make a garland easily and quickly!  I simply used a tiny bit of hot glue to attach the paper to some yarn I already had on hand.

For the pom pom garland, I bought 3 packages of pom poms from the Dollar Store, and then used a thicker quilting needle to string them onto yarn.  It came together super fast!  I love the pop of color, and I didn't even use a set pattern to string them on, I just tried to make it a little random and quirky.  I will definitely be pulling this garland out again and again.

I created all the "sayings" and "labels" in the gold frames, using picmonkey.  I printed them at Costco as a 5x7, and then put them in gold 5x7 frames from the Dollar Store.  I plan on reusing the frames for home decor or even a future party, I still haven't decided yet.

Probably my most favorite project I did for this party, were the gold animals that held up the names of the drinks and a few other labels.  I used this tutorial from Sugar & Cloth, and it came together super well!  Brett helped me with the drilling and spray painting, but it was super inexpensive and they made a fun eclectic statement.  I kept these to use for place card holders or on a desk as a memo holder, in the future.  They are dollar store animals, a dowel, and an alligator clip!  Who would've thought?!

The drink stirrers and toothpicks are either skewers or toothpicks with a piece of gold tinsel garland (from the Dollar Store) glued to one end.  Honestly though, these weren't used much, so I have a bag left of them.  I do like the pop of gold they added though, and I'll just save them to reuse for another party!

I also cut out some photo booth props using my silhouette machine, but there are tons of free printables on pinterest that you could easily print and cut out!  I just hot glued them to skewers to turn them into a "prop".  They are in my "party" box, ready to get reused (and possibly added to) for another fun occasion.  I just hung a little bit of garland on a blank wall, and guests had a great time snapping photos.  Unfortunately, we didn't snag a group one with everyone (we took it after midnight), but here is still some representation of the guests we had in attendance!


Aside from the photo booth, the party didn't have a lot of "structure".  I didn't have any planned games or anything.  But it worked out since it was a come-and-go party for a handful of guests.  I enjoyed getting to just catch up and chat with everyone.  I also gave a little house tour, since many of our friends haven't been to our new home yet.  Jacob and Camille were so kind enough to bring sparklers and we rang in the new year having some fun out in the backyard with them.


If you read through this entire post, then you can see that most everything came from the Dollar Store!  And many of these things (the golden animals, gold frames, pom pom garland, etc.) are things I will definitely be reusing!  Which means, that they were great to buy or make, since I'll get more out of them than just this one evening.

We had a great time hosting and mingling with so many of our friends, ringing in the new year!  I have a feeling 2014 is going to be a big and exciting year for us...we are so excited!  Happy New Year!

By the way, Camille did the sweetest post on attending our party, you should check it out here!  Her blog is fantastic, and includes a plethora of ideas for frugal or free date nights.  She has inspired many of our own activities.  Go visit her blog, she posts weekly, you won't be disappointed!  

To see what other things inspired this party, you can check out my Mocktail Party Pinterest Board!

PS--I am sorry that some of the photos are showing up grainy, I have no idea why, but plan on trying to figure it out ASAP!

1.03.2014

Fondue Fun: Romantic Date Night or Family Gathering

Have you ever had cheese fondue?  Or chocolate fondue?  If you haven't, you are missing out!  Depending on the atmosphere you create, it can be romantic and intimate or social and crowd-pleasing!  We made fondue two time the last two weeks, and created both of these very different experiences and had an amazing time with both!  I've heard that fondue restaurants can be such fun experiences, but are usually pretty pricey.  So if you can't afford to indulge in a night out on the town, give an at-home experience a try.  It really is a blast!  I'll share my recipes at the end of the post, they are both tried-and-true!

First off--let's talk "equipment".  If you have a fondue pot, use it!  If you don't, it might be something to consider purchasing if you think this might be something you enjoy.  It would also be a fun gift-giving idea for a family member!  We actually got ours for our wedding, which was a fun thing to receive.  A small mini crockpot would also work fine.  Or you could dip over the stove, although it's probably not as convenient or comfortable.  You just want to keep your cheese warm, so it stays ooey and gooey and easy to dip in!  You can buy the one we have here, at Target for less than $25.  It has worked great for us.

The romantic date-night "in" we did with fondue was on a Friday evening after Landon went down to bed.  It was a very uncharacteristically cold and stormy weekend, so we opted to light up our fireplace, laid down a blanket, grabbed some pillows, popped open some bubbly and ate right there on the ground.  We also had some tunes playing on pandora, in the background.  It was so fun!  We just relaxed, ate, visited, and enjoyed the evening together.  We ate slowly and really enjoyed each other's company. It was actually nice not being at a restaurant, feeling rushed to leave or wondering how badly it will hurt to pay the bill!

Here is a peek into our romantic evening...

Eating fondue is a much more interactive and social experience than most meals, so it is also very conducive to a bigger group!  A week or so later, we had my parents, siblings, and grandparents over to have a fondue dinner on Sunday evening.  We also had a chocolate fondue for dessert, which was a hit.  You could always just have friends over for chocolate fondue and skip the cheese and "meal" component all together.

Here is a peek into our family gathering...


I really hope this inspires a few of you to give fondue a try!  I have tried a handful of fondue recipes over the last couple years, and this cheese one (I got from a friend's mom) has turned out great every time.  The other ones I made didn't taste bad, but the consistency didn't set up well.  This chocolate fondue recipe is a really yummy and easy one as well.  Give them both a shot!

There are also a few ideas on things you can dip into your fondue.  Obviously, these lists are not comprehensive, by any means!  If something sounds yummy to you, try it!


12.09.2013

A Few Inspirations and Their Looks for Less

I got the Pottery Barn catalog in the mail a while back, and began perusing it.  For some reason, I have been on a "hosting" kick lately--kind of loving all things related to tablescapes, dinner parties, linens, and kitchen.  I kinda started crushing on this ridiculously expensive set of salt and pepper shakers I found in the Pottery Barn catalog (let's be honest, I would have a hard time spending $40 on a small set of dishes, so a set of salt and pepper shakers is out of the question for this thrifty girl!).  But I also remembered seeing this adorable set at Target, for a mere $2.99...now that I can work with!  And if owls aren't your thing, I also really liked these other little creature sets from Target (here and here).


I also fell in love with Naomi's pom pom Anthropologie table runner she used at her Thanksgiving dinner (I couldn't find the image on their website, they must be sold out, however I have a sneaking suspicion that it is out of my budget), but it comes from the Nomades Table Linen collection.  I found this knock-off tutorial on the blog "At Home on the Bay", and plan on trying it!  I don't think it would be very hard to replicate, and would go with a lot of tablescapes.


I also needed to make stockings for our little family this year.  Our old ones were not looking so great, Landon still didn't have one and I know that we will for sure have a fourth member of the family by next Christmas :) Pottery Barn also had some beautiful faux fur stockings, and I was also inspired by some that I found on Pinterest.  So for less than the cost of 1 Pottery Barn stocking, I whipped up 4 new ones for my fireplace.  I borrowed a stocking pattern from a friend, because I loved the size of hers.  What really makes these different than any standard stocking, is the heavier and textured upholstery fabric and faux fur cuff.  They are made the same way you'd do any other one!  I used pom-pom trim for my loops, so much simpler than trying to make my own faux fur pom pom, but you still get the same look.  If you are in need of some new stockings, maybe this will inspire you!  They are a project you can whip up in an evening or two.


Have you found anything lately that you can replicate or find elsewhere for less?  I want to hear!  It's always fun to find or make an affordable alternative!

12.05.2013

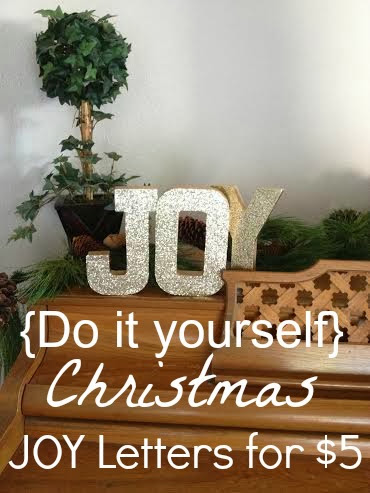
JOY to the World: Holiday Letters for $5

I always find such inspiring (often intimidating and/or expensive) projects all over Pinterest.  This is definitely not one of them!  This project comes together in a matter of minutes, and adds a lot of pizzazz to your holiday decor.

I was inspired to do this project by this pin, but sadly it did not have a tutorial linked to it.  But I knew I could probably replicate it fairly easily, and I was very pleased with the results.


My supplies cost me right around $5 (assuming you already have mod podge and basic supplies).  I bought 3 paper mache letters and some gold glitter paper from Hobby Lobby (don't forget to use a coupon on one of the items you purchase, if they aren't already on sale!).

I did have my husband spray paint the back and sides with gold paint we already had, but I don't think it is necessary.  Especially if you choose to do a gold glitter paper.  If you opt for a silver glitter paper, you might want to paint the back and sides a silver or gray for a more cohesive look.
Trace the letter backwards onto the back of the glitter paper.  Cut out the letter.  Apply a thin layer of mod podge onto the front of the letter and lay down the cut out paper that matches the letter.  Firmly press down on the paper (rest a heavy book on top of it for a few minutes, if desired), let set and dry.  Then use as decor wherever your heart desires!  Obviously, the possibilities are endless.  Any word can be used!  NOEL would also be one I would love!   (Keep in mind the cost will go up some if you use a lot of letters, but it is still very affordable decor!).  And any color of glitter paper would also be very beautiful.  Silver or red would be very festive.  I have it set on top of my piano.  It would look gorgeous on a mantel, bookshelf, end table, etc.  
I hope you give this project a try.  It really comes together quickly and inexpensively (my favorite kind of projects), and really adds to the existing decor in my house.  Happy Holiday Crafting!

12.03.2013

Happy Holidays!

Well, I went missing a tad longer than I anticipated...for no good reason other than the routines and responsibilities of regular life get in the way.  And with the holiday season now in full-swing, schedules are just getting busier and jam-packed.  It's the down-side of being an adult during the holidays--you have church and community things that you might be in charge of, shopping lists to purchase (meaning wallets are empty!), and the logistics of lugging out the decoration totes with a big pregnant belly!  And if you are anything like my family, you have about a million birthdays squeezed in between Thanksgiving and Christmas!

But there is still magic in the air, right?!  I love this time of year! I can hardly soak it all in before it's time to anticipate the next holiday season.  There are so many amazing festivities (many free or inexpensive) to spend time with your family, sentimental traditions, service rendered to loved ones and strangers, and of course--reflecting on our blessings and on the birth of Jesus Christ.

Landon is starting to walk (finally, yay!), and had his first napless day on Thanksgiving (not fun!).  Brett has been busy working overtime as his fourth quarter of the year is winding down, and I've been keeping him plenty busy with house projects and helping me with decorations when he is home (bless his heart).  I've been helping baby girl grow bigger and longer, trying to keep up with my day-to-day duties and I burned my neck with the curling iron for the first time in years (so now it looks like I'm sporting a hickey and it's a bit embarrassing).  You're pretty much caught up on what we've been doing while I haven't been blogging, ha!

These are the best photos we could get at Thanksgiving.  It was a long day with this little dude...I'm already a little nervous about what I'll do next year with two little ones!


Landon looking adorable in some of his winter gear.  He is the cutest giraffe I ever did see...

Stay tuned, because I have a couple simple tutorials I am getting ready to share for this week!  We are talking Christmas decor you can do for around $5, and in a matter of minutes!  What could be better?!  I'm also working on maybe a few simple gift guides and an idea board for a frugal New Year's Eve Party (that I plan on actually throwing myself).  Oh, and a few fun date night or family fun ideas to share!  All these ideas are swirling around in my head, but I am working on getting them written up now!  So come back and visit soon and often!